Lately Nikon has introduced several new camera bodies for everyone from newbies on up, and they're a huge jump from the last generation(except the D60).
The reason why I mention all this is if you're looking for a new camera, there are lots of great choices now, and if you're looking for something used then it just got a lot cheaper.
The D300 has also dramatically dropped in price, which is most likely due to the fact that Nikon just announced the D700, which will be kind of a midway point between the D300 and the D3.
It really seems like Nikon is trying to get back in the DSLR game which is great news.
Wednesday, July 23, 2008
Tuesday, July 22, 2008
A few new pictures of mine:
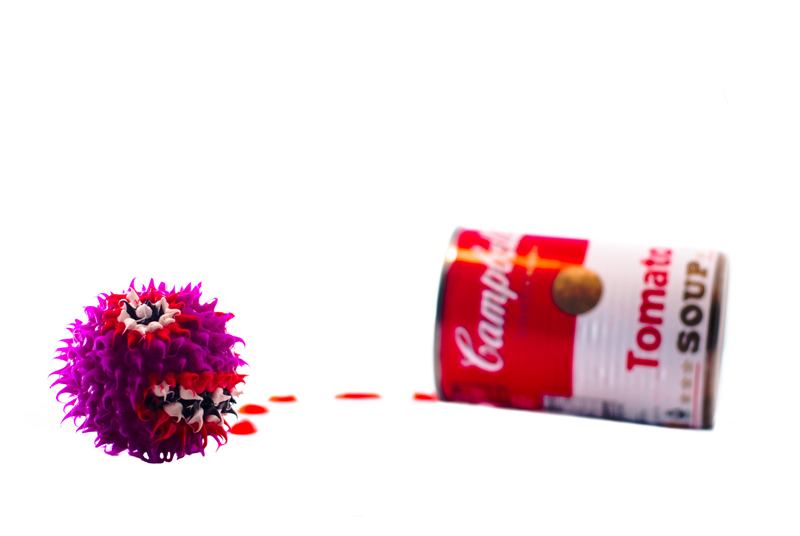
Lately I've been trying to better my product photography, so here are a couple of my latest:


You can check out the full versions on my DeviantArt, but don't forget to check out my professional site.
You can check out the full versions on my DeviantArt, but don't forget to check out my professional site.
Friday, July 11, 2008
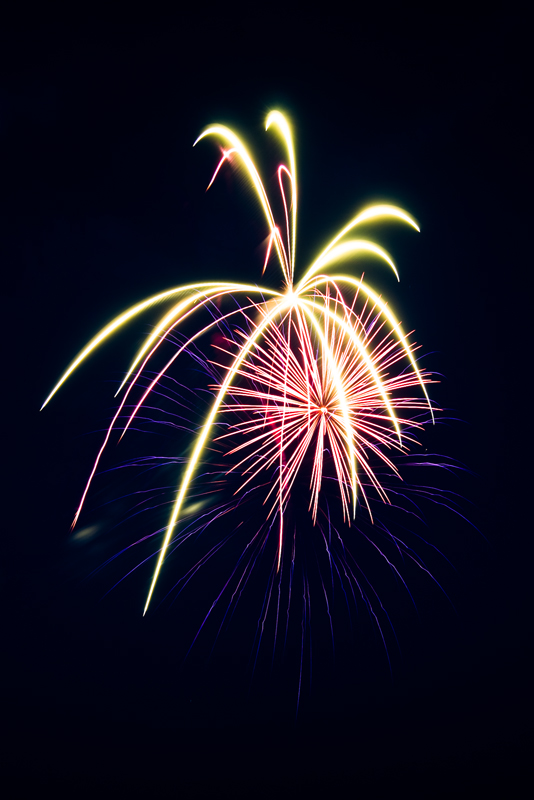
Fireworks pt. 2
From my last fireworks post I kind of left off not telling why my camera settings were what I chose. Here I'm going to explain that and in the next post I'll explain what I did in photoshop to make it look even better.
First of an example:
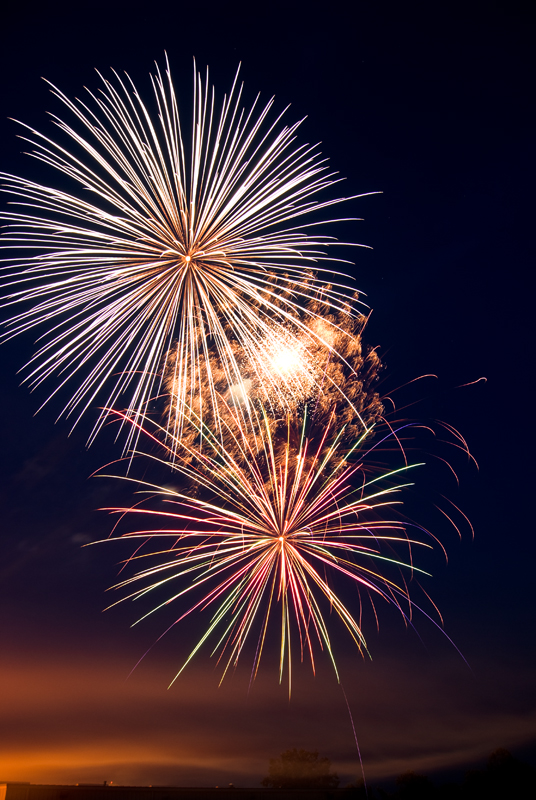
Shutter Speed: 20/1 second
F Number: F/5.6
Focal Length: 18 mm
ISO Speed: 100
Now, why did I choose those settings? Take a minute and try to figure it out, every one of those settings has a significant effect on the picture in this case, and I set them all manually.
Ready?
Ok, my shutter speed was 20 seconds, so that I could get several mortars exploding in one picture, without cluttering the pciture with too many explosions.
My ISO was 100, because the night sky is mainly dark blue, which really emphasizes any noise in the picture so I wanted as little as possible.
My aperture was f5.6 because the effect of the explosion is almost instantaneous, as are the trails. It's a lot like working with flash, the flash happens so fast that shutter speed doesn't affect it.
My focal length was also specifically chosen. 18mm is the widest angle setting on the kit lens(my only wide angle lens at the moment). They were big explosions, and it was easier to shoot a little(although not much) wider and crop a little in photoshop, than to cut off the sides of the explosions.
Oh yeah, one other thing. To get good fireworks pictures...
You're gonna have to manually focus it. Or cheat like I did.
The reason is because it takes a second or two to autfocus on anything, but with fireworks that would cause you to miss the shot. By manually focusing it before hand, or focusing on something the same distance away and then turning auto focus off, you can easily click the shutter just before the first explosion.
Hope that helps you for next fourth of july, don't forget to check out my deviant art and portfolio site on the right side of the page:)
First of an example:
Shutter Speed: 20/1 second
F Number: F/5.6
Focal Length: 18 mm
ISO Speed: 100
Now, why did I choose those settings? Take a minute and try to figure it out, every one of those settings has a significant effect on the picture in this case, and I set them all manually.
Ready?
Ok, my shutter speed was 20 seconds, so that I could get several mortars exploding in one picture, without cluttering the pciture with too many explosions.
My ISO was 100, because the night sky is mainly dark blue, which really emphasizes any noise in the picture so I wanted as little as possible.
My aperture was f5.6 because the effect of the explosion is almost instantaneous, as are the trails. It's a lot like working with flash, the flash happens so fast that shutter speed doesn't affect it.
My focal length was also specifically chosen. 18mm is the widest angle setting on the kit lens(my only wide angle lens at the moment). They were big explosions, and it was easier to shoot a little(although not much) wider and crop a little in photoshop, than to cut off the sides of the explosions.
Oh yeah, one other thing. To get good fireworks pictures...
You're gonna have to manually focus it. Or cheat like I did.
The reason is because it takes a second or two to autfocus on anything, but with fireworks that would cause you to miss the shot. By manually focusing it before hand, or focusing on something the same distance away and then turning auto focus off, you can easily click the shutter just before the first explosion.
Hope that helps you for next fourth of july, don't forget to check out my deviant art and portfolio site on the right side of the page:)
Monday, July 7, 2008
A couple of things worth taking a look at:
Last night when I should have gone to sleep already, I found a couple of things that were basicly a digital dream come true.
Dream come true #1 is called PicLens and it basicly provides an interesting 3D way of viewing different media directly in firefox(and a few other browsers). It's great for flickr, youtube, and deviantart users because you can browse thousands of pictures and videos in seconds.
Just make sure you have a fast connection!
Dream come true #2 is called LiveMocha, and it's a community based website for people wanting to learn a second language. It's based on a technique of learning involving looking at pictures and hearing native speakers, to learn a language the natural way. It's somewhat similar to Rosetta Stone, but much much more affordable(free vs $220 a level).
Saturday, July 5, 2008
Fireworks
We had some awesome fireworks the other night for Independence Day. Below are some of the pictures I took, and afterwards some details on how I took them.

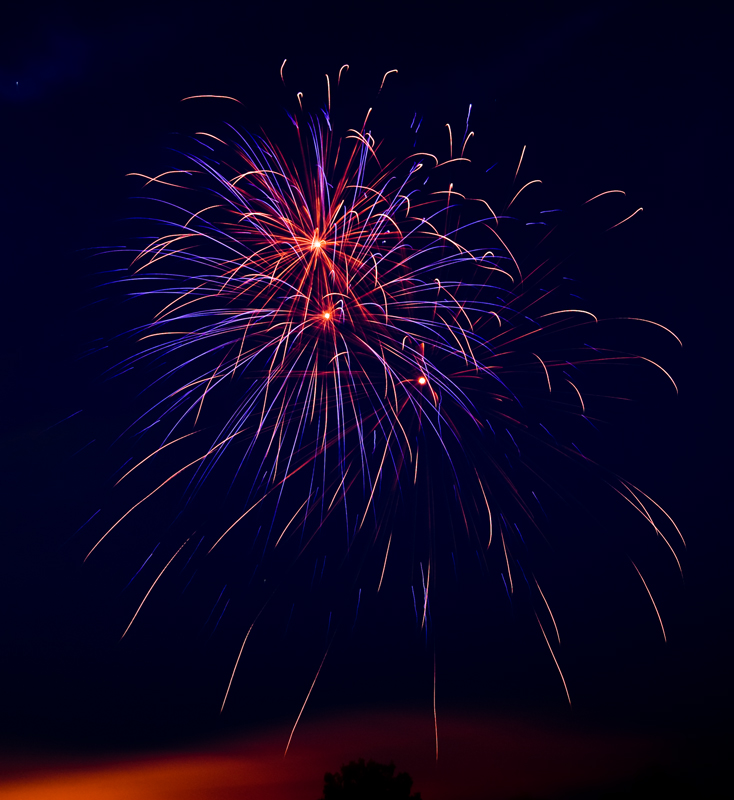

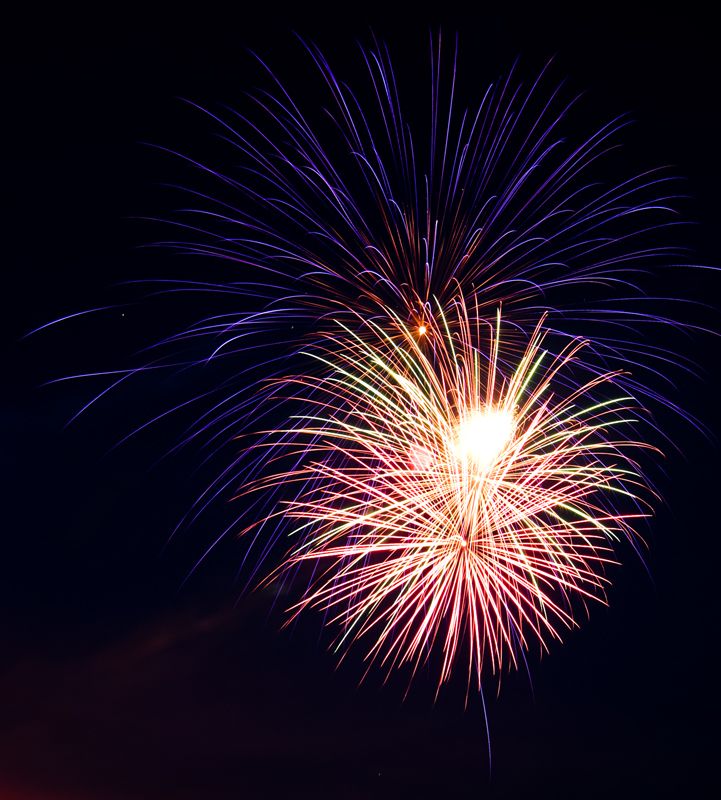
You can find the originally sized and uncompressed versions on www.killrb323.deviantart.com
Most of these were taken with a long exposure of 20 seconds around f5.6 @ ISO 100. Next time I'll post on exactly why that is...
You can find the originally sized and uncompressed versions on www.killrb323.deviantart.com
Most of these were taken with a long exposure of 20 seconds around f5.6 @ ISO 100. Next time I'll post on exactly why that is...
Tuesday, July 1, 2008
Coming soon... Photoshop vids!
As part of photography, you will need to know how to use photoshop. Unfortunately with all of it's power it is also very difficult to learn on your own.
So I've decided to start doing photoshop videos as soon as I can find a good program to record the screen capture.
I'm also working on a website for my photography business, which should be posted soon.
Thanks for watching!
So I've decided to start doing photoshop videos as soon as I can find a good program to record the screen capture.
I'm also working on a website for my photography business, which should be posted soon.
Thanks for watching!
Saturday, May 24, 2008
A bit about ISO/ASA......
Rather than using my own pictures this time I'm going to be showcasing a few pictures from an e-friend of mine who does a lot of work on movie sets.
Today I'm going to cover ISO/ASA and why you need to understand how to use it effectively. ISO and ASA are the same thing, and so from here on out I'm going to refer to them simply as "ISO".
ISO is a measurement of the sensitivity of the device used to capture the light let in through the lens. That's it. That's ISO in a nutshell.
Now you may be wondering why it matters and where it ties into everything else, which is good because I'm going to tell you.
My general rule for effectively using ISO is this, leave it on it's lowest setting unless you need it to be higher. Why would you need it to be higher? You will always use ISO to give you the right exposure at whatever shutter speed and aperture you need, but never the other way around.
Now for the implementation:
therealmr does a lot of work on movie sets and that doesn't provide him with a lot of light. I'm sure you all know by now that having a slow shutter speed will make your pictures blurry, and you've probably also noticed that the great majority of lenses don't go below f3.5 or f2.8.
So if your aperture won't go lower or you want to maintain your depth of field, and your shutter speed is as low as you can take it without getting blurry pictures, what do you do?
You turn your ISO up.
I wouldn't advise shooting above 200, or really 100 ISO unless you just don't have an option. I will say this however; even with entry level DSLRs, the noise at 1600 ISO is comparable to the amount of grain you might see in some of the 400 ISO film I used to use, so don't take things too seriously.
I'll finish todays post with a few examples of someone using a high ISO constantly, and some of the why.

In this picture using flash would have destroyed the interesting pattern on the wall, using a slower shutter speed may not have frozen the dancers motion resulting in a blurry picture, and his lens was already at 2.8 which is probably as low as that particular lens can go. All this resulted in him using 800 ISO, to achieve a proper exposure.
Today I'm going to cover ISO/ASA and why you need to understand how to use it effectively. ISO and ASA are the same thing, and so from here on out I'm going to refer to them simply as "ISO".
ISO is a measurement of the sensitivity of the device used to capture the light let in through the lens. That's it. That's ISO in a nutshell.
Now you may be wondering why it matters and where it ties into everything else, which is good because I'm going to tell you.
My general rule for effectively using ISO is this, leave it on it's lowest setting unless you need it to be higher. Why would you need it to be higher? You will always use ISO to give you the right exposure at whatever shutter speed and aperture you need, but never the other way around.
Now for the implementation:
therealmr does a lot of work on movie sets and that doesn't provide him with a lot of light. I'm sure you all know by now that having a slow shutter speed will make your pictures blurry, and you've probably also noticed that the great majority of lenses don't go below f3.5 or f2.8.
So if your aperture won't go lower or you want to maintain your depth of field, and your shutter speed is as low as you can take it without getting blurry pictures, what do you do?
You turn your ISO up.
I wouldn't advise shooting above 200, or really 100 ISO unless you just don't have an option. I will say this however; even with entry level DSLRs, the noise at 1600 ISO is comparable to the amount of grain you might see in some of the 400 ISO film I used to use, so don't take things too seriously.
I'll finish todays post with a few examples of someone using a high ISO constantly, and some of the why.
This is a good example:
In this picture using flash would have destroyed the interesting pattern on the wall, using a slower shutter speed may not have frozen the dancers motion resulting in a blurry picture, and his lens was already at 2.8 which is probably as low as that particular lens can go. All this resulted in him using 800 ISO, to achieve a proper exposure.
Another example:

Here his lens was at f1.4, his shutter speed 1/50 sec, and his ISO was 1600, and his picture is just barely exposed well. Once again, his lens couldn't go to a lower aperture, and his shutter had to be reasonbly fast to reduce camera shake from blurring the picture.
One last example:

ISO 800, 1/160 sec, f2.8
Thanks to therealmr for the permission to use his photos. Please visit him here.
Thanks to therealmr for the permission to use his photos. Please visit him here.
Tuesday, April 22, 2008
Aperture Bascis: Part 2 - Shutter Speed
Aperture Basics: Part 2 – Shutter Speed
Please keep in mind that, while this is one of the most basic lessons to be learned photography it is also one of the most fundamental and important ones, so pay close attention.
What we have covered so far, is that aperture greatly affects depth of field. What I have only mentioned in passing is that it also affects shutter speed.
What is shutter speed?
I’m glad you askedJ Shutter speed is the amount of time the camera’s shutter stays open, and consequently the amount of time light is allowed to enter the camera body and hit the sensor/film.
What is a sensor?
A sensor is a flat piece of silicon and plastic that sits inside of a camera where other film would be. There has to be something inside a camera to capture the light, and since there is no film, there must be an electronic sensor. If you have a question about this please leave a comment. There will be posts later on that go into more specifics about the sensor.
What does this have to do with aperture and depth of field?
Well, we have already established the link between aperture and depth of field. The reason aperture is linked to shutter speed is because they both influence each other. The lower your f-stop is, the more light you let in. When your aperture lets in a lot of light, your shutter doesn’t need to be open very long to let in a lot of light.
How can I use this to my advantage?
Below is an example of a situation where I didn’t care what my depth of field was, as long as I had a fast shutter speed(1/4000 of a second):

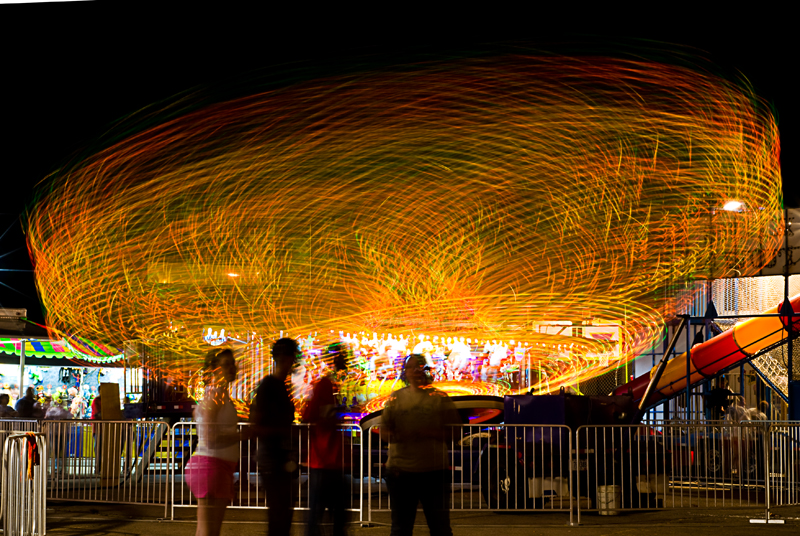
Here is an example where I needed a long shutter speed(20 seconds):
Now these are two very different examples of shutter speeds.
One froze motion, using a very high shutter speed, and consequently required a low f-stop to let in enough light to exposure the scene enough.
The other was very long and capture a lot of movement, which required a small aperture. The reason here being that, the lights on the ride were bright, but moving very slowly. In order to properly expose them while showing their movement for 20 seconds, I could only let in so much light over time.
The next post will be more practical examples of using shutter speed and aperture together, probably followed by a post on using ISO/ASA.
Friday, April 18, 2008
Aperture Basics: Part I - Aperture and Distance
Aperture and Depth of Field: Part 1
What is aperture?
Aperture is a type of measurement used by scientists to determine the half life of a nuclear reactor.
Well, no….
Aperture is a measurement, but is a number usually referred to as an f-stop. This number is a reference to how large the front element of a lens is opened compared to how long the body of the lens is.
So what?
Aperture affects a lot of things in photography, and is usually my first consideration when taking or setting up to take a picture. When taking a picture my first consideration is usually depth of field, which is linked directly to aperture and camera-subject distance.
The picture below has a very short depth of field, and is produced by being very close to the subject, and having a very low aperture (f-2.8). Please click the picture to see a larger version:)
The picture here has reasonably long depth of field, which was created by being somewhat far away from the subject(s), and here, more significantly a higher f-stop (f-16)
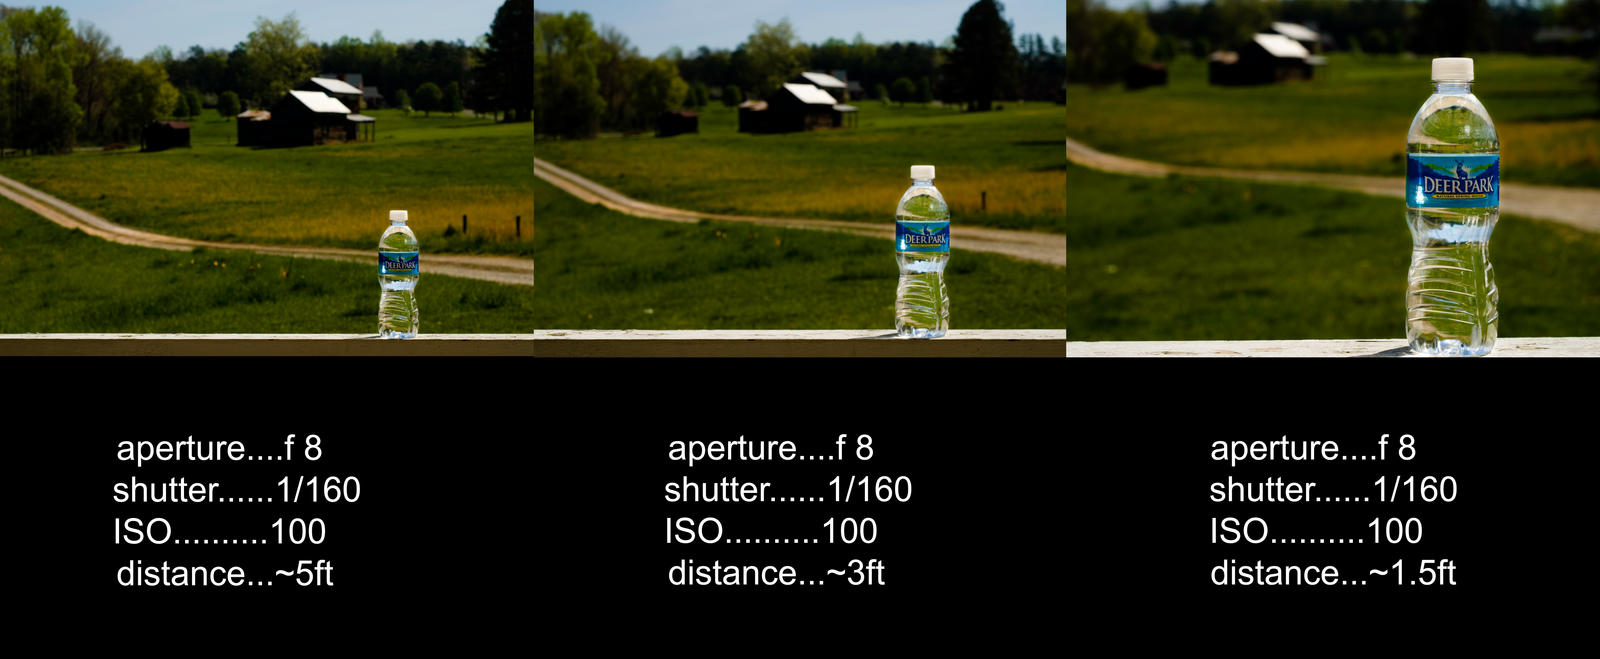
Now a more concise example of aperture:

Notice what is happening in these pictures. The distance stays the same, but the depth of field grows.
Why? The aperture is getting smaller and smaller, and the shutter speed is getting longer to compensate.
And the same of camera-subject distance
Now look at what happens here. The aperture stays the same, therefore the shutter speed doesn't need to change, but yet the depth of field changes.
Why? It's because the distance changed. The closer I got to the water bottle the more blurry the background got. This is because the focus was closer to me in each shot, rather than at a static distance like the first series.
As you can see, the distance and aperture both play a big role in depth of field. Try to think of them in this way:
For a short depth of field(blurry background) get close and use a lower f-stop.
For a long depth of field(clear all the way through) get farther away and use a higher f-stop.
Learn to use these rules to your advantage.
There is a lot more to depth of field and aperture than this, but I'm trying to cover this in little bites.
If you don't know how to adjust your aperture, you really need to at least take a peek at your manual, but I'll give you a starting place. You need to put your camera in A(Av for cannon) or M mode. Aperture mode(A/Av) lets you set the aperture with the camera setting shutter speed, and Manual(M) lets you set aperture and shutter speed. More on that later though.
In my next post we’ll explore the practical applications of aperture and distance, and what aperture has to do with shutter speeds.
Tuesday, April 8, 2008
Wow, what a mess...
Well over the last 2 weeks or so I've been trying to get blogger to unlock my page, and it finally happened. Thanks guys(if you're watching).
Anyway the next big thing here will more than likely be a guide on the basics of aperture based exposure. It may take a while to put together though, since I'm going to try and go a bit in depth with it.
Anyway the next big thing here will more than likely be a guide on the basics of aperture based exposure. It may take a while to put together though, since I'm going to try and go a bit in depth with it.
Friday, March 21, 2008
Coming Soon:
This is more or less my plan for this blog in the near future, with random interjections in between:
I. Natural Light Photography
-Aperture Basics
*Depth of Field
*Flash Impact
*How it affects shutter speed and ISO settings
-Shutter Speed Basics
*Fast Shutter Speeds
*Slow Shutter Speeds
-ISO
II. My Workflow
-Importing
*Importing
*Photoshop and Adobe Raw
*Raw vs. Jpeg?
*Backing Up
*Photomanipulations and Digital Paintings
III. Strobist-esque Lighting Techniques
-What flash do I buy?
-How does it work?
-There's math involved?
-Why not just leave it on the camera?
-Indoors/Outdoors
IV.Random Other Hobbies(possibly)
-Soldering/Electrical Work
-Internet Videos
Keep in mind that they may not come in this order, and other details may be changed along the way.
Thursday, March 20, 2008
My Goal for This Blog
The purpose for this blog is to distribute the tips, techniques, and various bits of knowledge I've picked up that may be useful to other photographers and photoshop users. This blog will mainly pertain to photography but from time it will include information on other topics like finances, burrito recipes, potato guns, etc.
If there is something specific you would like to see here please leave a comment and I'll do my best to respond either directly or by implementing the changes.
If there is something specific you would like to see here please leave a comment and I'll do my best to respond either directly or by implementing the changes.
Subscribe to:
Posts (Atom)


